
How to set Shuttle Current Test on Neware BTS for lithium-sulfur batteries? What is Shuttle Current Test? The following information comes from Google Gemini and my friends who research lithium-sulfur batteries.
I asked Google Gemini: How to set Shuttle Current Test on Neware BTS for lithium-sulfur batteries? What is Shuttle Current Test?
What is the Shuttle Current Test in Lithium-Sulfur Batteries?
In Lithium-Sulfur (Li-S) battery research, the Shuttle Current Test is the primary quantitative method used to evaluate the severity of the “polysulfide shuttle effect.”
Because long-chain lithium polysulfides (LiPS) are highly soluble in organic electrolytes, they tend to migrate between the cathode and anode. This parasitic movement causes continuous oxidation and reduction reactions, leading to low Coulombic efficiency, high self-discharge, and rapid capacity fading. The shuttle current test measures this non-productive parasitic current.
1. Testing Principle of Shuttle Current Test
The test typically employs a potentiostatic (constant voltage) hold method. During the charging process, at the voltage where polysulfides are most prevalent, the battery is held at a constant potential. If a shuttle effect exists, polysulfides will be continuously oxidized at the cathode and reduced at the anode, creating a persistent compensation current. The steady-state value of this current represents the “shuttle current” at that specific voltage.
2. Testing Procedure of Shuttle Current Test (e.g., using Neware or similar testers)
Galvanostatic Charge: First, charge the battery at a constant current (CC) to a specific target voltage (typically between 2.35 V and 2.45 V, where the shuttle effect is most pronounced).
Potentiostatic Hold: Switch to constant voltage (CV) mode and maintain that voltage.
Current Decay Observation: The current will gradually decay over time. However, due to the shuttle effect, the current will not drop to zero but will instead reach a stable plateau.
Data Recording: This final steady-state current is recorded as the shuttle current for that voltage.
3. Purpose and Significance of Shuttle Current Test
Quantitative Evaluation: It allows researchers to compare the effectiveness of different electrolyte additives or functional separators (e.g., carbon coatings or polar material interlayers) in intercepting polysulfides.
Predicting Self-Discharge: A higher shuttle current directly correlates to a higher self-discharge rate when the battery is at rest.
Optimization of Charging Protocols: Analyzing shuttle currents at various voltages helps in setting appropriate charge cut-off conditions to minimize degradation.
4. Key Parameter Recommendations
Voltage Selection: It is recommended to test at 2.38 V or 2.40 V, as these potentials represent the critical transition zone between the high and low voltage plateaus.
Holding Duration: The hold typically needs to last for 10 hours or more until the current curve becomes completely horizontal (reaches steady state).
Temperature Control: Since the shuttle effect is highly sensitive to temperature, tests must be conducted in a strictly controlled environment (e.g., 25°C) to ensure comparable results.
5. Technical Terms Summary of Shuttle Current Test
Shuttle Current: The parasitic current caused by the shuttle effect.
Polysulfide Shuttle Effect: The migration of intermediate sulfur species between electrodes.
Potentiostatic Hold: Maintaining a constant voltage.
Steady-state Current: The stable current reached after initial decay.
Self-discharge: The loss of stored charge without an external circuit.
I asked my friend, his answer is:
Source: WeChat Official Account “Brother Radish” 萝卜大师兄 Lbdsx
Today, I’ll share the setup steps for shuttle current testing in lithium-sulfur batteries. Reference: Adv. Mater. 2025, 37, 2501869.
The shuttle current test characterizes the effect of suppressing polysulfide shuttle. The smaller the shuttle current, the better the suppression effect.
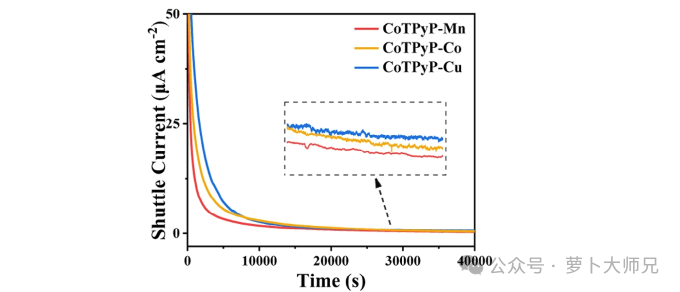
As shown in Figure 1, assemble the lithium-sulfur battery and then discharge it to 2.38 V at 0.5 A/g. Then, maintain a constant voltage discharge at 2.38 V for 40,000 s (refer to Figure 2 for 40,000 s; the test time should vary depending on the materials. You can first set a time and see if the current stabilizes within that time, then adjust the time based on the test results).

The specific setup steps are shown in Figure 3. First, discharge with a constant current to 2.38V, then discharge with a constant voltage for 12 hours (the specific time can be set according to your own situation). Do not set the cutoff current. The test is only controlled by time. Set the upper and lower voltage limits for protection. We are using Neware battery cyclers.
Step Index Step Name Step time Voltage Current Cut off V C rate Cut off A Time record conditions(s)
In others, set “Voltage limit protection 2V~3.3V” “Voltage limit protection 1.7V~3V”
Active material 1 mg Nominal specific capacity 1675mAh/g C-rate mode
For reference only. Please set appropriate parameters according to your battery materials.
.png)
For reference only. Please set appropriate parameters according to your battery materials!!!
Due to the limited knowledge and English level is inevitable errors and omissions, if there are errors or infringement of the text, please contact me as soon as possible by private letter, I will immediately be corrected or deleted.